Introduction to Draw an Anime Character
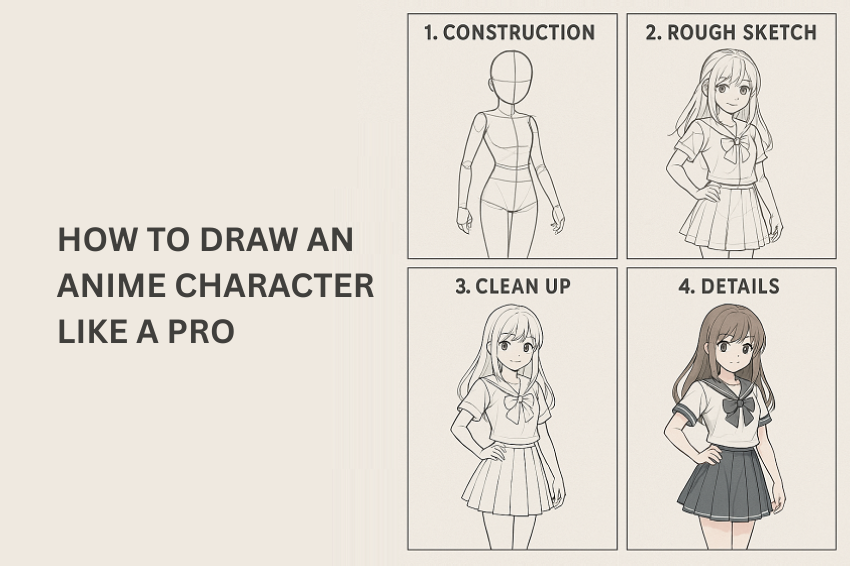
To draw an anime character like a pro, it is important to learn several basic steps of cartooning, but it is also important to know about the special features of anime. Like every profession, creating a character that has depth and looks professional requires time, effort and a certain sequence of actions. In the next section I will show you how to draw an anime character step by step, just sit back and let the artist inside you come out.
What is Anime Art?
Anime art is a style that has its roots in Japan, has unique main characters and original setting of the story. While primarily a distinctive extra-illustrated graphic style, the art form also covers a vast spectrum of preoccupations with aesthetics. From highly exaggerated face and figure idiosyncrasies characteristic to shōnen and shōjo figures to more lifelike and credible appearance of the anime. Each of these aspects needs to be clearly understood by anyone who wishes to produce perfect representations of anime characters.
Step-by-Step Guide to Draw an Anime Character
Below are step-by-step explanations that can assist you draw an anime character from scratch and improve your drawing skills.
The Character Development
In real life there are no cartoons; before you decide to grab a pencil to draw, conceive a character. Contemplate their personality, position in a narrative or any other performance, and characteristics or attributes. This will to some extent affect how they design their personalities, their emotions and how they carry themselves. Keep these points in mind:
- Backstory: Create a backstory for the character so that his/her design and behavior is based on his/her history.
- Personality Traits: Are they shy, outgoing, mysterious, or cheerful? All the above-mentioned aspects should be expressed in their design.
- Culture Setting: As much as this is not very important, it may help to add some details if your character is found in a certain cultural background.
Sketch the Basic Structure
First of all, it is necessary to draw a rough outline or an outline of your character. This involves sketching of simple forms and lines characterized by the representation of the outline of the character. Usually, anime characters stand out with circles in their heads, an oval for trunk and rectangles for arms and legs. The fundamental instrument in this stage is to determine the position of the elements of the game and the scale of the illustrations.
- The Outline: Draw the head in the form of an oval, eyes in circles, and the nose and mouth in the form of triangles.
- Lightly Index the Features: Trace a hairline, eye sockets, eyebrows, ears, eye folds, neck, and shoulders lightly on each character. Horizontal placement should be done on the eyes while vertical alignment on the eyes should also be done.
- Construct the Body: The figure must be built using stick figure but can be made bigger or smaller depending on the personality of the character in representation (e.g. a taller figure may be appropriate for a hero).
Through the analysis of several anime characters, it has been seen that they have a very disproportionate figure in which the head is almost about three times the size of the body. In the case of such specific styles, it is further divided as chibi at a 3:1/4:1 ratio.
While slender characters which are athletic by nature may have broader shoulder areas and thin waists, Rounder characters may also be considered slightly chubby.
Refine the Anatomy
After getting to this stage, dedicate some more time to enhancing on the structure of the character in order to give the character an attractive look. Keep the prominent features such as eyes, hair, nose, mouth, spine, hips, shoulders etc., so that the character appears to have some shape and not out of proportional.
- Eyes: The eyes region is very significant in anime and plays a significant role in the illustrations made. Do them big and looking clearly to the iris and the pupil because they tell a lot about the character’s emotion.
- Hair: Anime hair is from simple short hair to long and flowing hair of some sort. Look at the hair as a component that determines, to a large extent, the character’s personality; when choosing hair, pay attention to the direction and texture of the hair.
- Nose and Mouth: Keep these simple. Some amines do not draw noses, or else the noses are depicted simply and unconvincingly; mouths are depicted as small, and teeth are few for the number of characters depicted.
- Spine: This is the main axis along which the posture should be made. Straight lines depict the figure in a rest position or posture while the curves depict the action or emotion of the figure.
- Arms and Legs: Check out that the joints are set to the correct sizes as well as the position of the joints. The two common mistakes are positioning of the elbows and knees.
Follow guidelines to form body, limb and joints in a very slim and thin way. Yes, stylized characters can be effective even without a good knowledge of overtone, however it is helpful nonetheless. Pay especial attention on the character’s posture. It is true, some posing is more active and gives an idea of temper and temperance.
Add Details and Features
Now that the character’s structure is sketched, it is essential to add facets that would embody the character’s personality. This is in terms of aspects such as dresses, expressions and any other ornaments worn.
- Clothing: Reflect your character’s personality and background through their attire. To do this, consider the kind of material, the cut and any other features of the clothes like the prints and the trimmings.
- Expressions: Develop facial expressions. The plural form of a single brow and an eye can express various emotions, with the more emphasized features emphasized in the painting.
- Accessory: This can be weapons or any ornament or object that gives information about the role of the character or about the character’s character.
It has been seen that harmony is better maintained when there are smooth lines that follow certain directions or curves. When you need to fine tune, the lines of your sketch while not erasing the rough drawing, it is best to use a lightbox or a tracing paper.
Ink and Define the Lines
Ink after you are done with the sketching part when you are content with the outlining. In the case of creating a character, employ smooth and unbroken lines without striving for any sharp edges. Increase the thickness of the line in order to add more distance to shape and to accentuate some part of the character.
- Choose Your Tools: You should use pens, brushes, or any other equipment that will help to draw clean lines.
- Specify the Stroke: Use thick lines for the outer boundary and thin lines for further details.
- Hatching: Use a lighter crosshatching to give impressions to clothes and hair.
- Line Weight: Thick lines can be utilized to create shadow as well as outer outline, thin line added in details and inner outline.
- Clean Up: Lastly, remove lines with gentle wiped or wash, which may not leave an impact on the final lines of the drawing.
This is as regards line drawing style and thickness, I kept it as thin as the characters of the comic strip. This means that although thick lines can be interpreted as strong, thin lines can be construed as breakable.
Shading and Coloring
Characters in anime have quite simple color schemes and very little if any depth values, but the placement of such will help in the shading.
- Flat Colors: For two players, each of them is to choose an appropriate color scheme based on the chosen character Personality. For an ordinary anime appearance, apply clean, straight, and mostly primary color tones to the lines and figures.
- Shading: If you require depth then try to apply cel shading where the characters are filled with solid color each with its shadow and highlight effect.
- Lighting Type: Decide, from what direction the light will emit and then put proper shadows if any. They can also help in modelling to give a more stereoscopic view of something.
For a clean finish, users should use other applications such as Photoshop or Procreate for selective color graduation. Utilize layers for easy editing. In this case, before painting, it is possible to try different blending modes to obtain desired effects.
Add Backgrounds and Effects
Although it shall be understood that character is the main focus, backgrounds and effects should also be beneficial. This could be as basic as a couple of environment elements or as elaborated as a setting that goes hand in hand with the character.
- Background: While drawing an anime character for the game it is advised to draw a simple background that will suit the character.
- Atmosphere: Some texture or gradients should be added here to help set the mood like a smooth sky for a more serene environment.
Secondary effects would also be drawn in to cater for certain actions such as speed lines for moving, or sparks for magical phenomena. These should do it without overemphasizing themselves on the character but rather giving the story a rich flavor.
Final Touches and Presentation
Check through your material to see whether there is anything that you can or need to do in terms of fine tuning your artwork. This could be deepening some elements, sharpening up more colors, or leading more textures. Make sure they become presentable and ready for presentation.
- Realistic Textures: Texture is the way to enhance clothing or skin with realistic textures to add some realism on top of the stylized effect.
- Detail work: This is the last process of structuring where any of the details may be added or modified depending on the effectiveness and convenience of presenting the content.
- Presentation: Decide on the manner of submission of your work, whether it will be in electronic or hardcopy form. When you take your art work for photography next time, make sure that the frame chosen is well, and the lighting is appropriate.
It is advisable to have your artwork as clean as possible and to ensure that it looks as professional as possible. Some suggestions include framing or, if in the digital platform sharing mode, to use. Feedbacks are also essential in group activities since they help determine strengths and weaknesses in the process of learning.
Conclusion
Most people may consider that it is very difficult or almost impossible to draw an anime character as a professional, but actually it is very fun and enjoyable. To achieve an excellent character design, it is good to learn the type of anime aesthetics, how to develop the said character, and the tips on enhanced techniques.
Remember that all these changes start from practice, perseverance, and readiness to learn more. Keep drawing, painting, sculpturing or creating anymore you will find that you will see yourself as artist who improves with age.
I always believe that it is great motivating factor within artists to create their own characters for personal, fan art, or commercial uses. As I have stated before, it is the nature of the process, show your creativity now and make your lines and coloration a joy. Happy drawing!